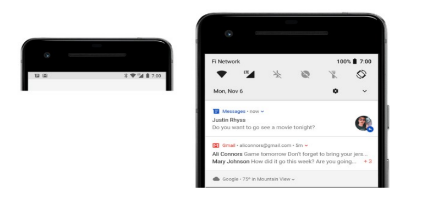
Las notificaciones son un sistema de alertas visuales con mensajes que aparecen en la barra de estado de nuestro terminal Android. Son los típicos mensajes que te avisan de que tienes llamadas perdidas o un mensaje SMS nuevo. Al «desplegar hacia abajo» la barra, aparecen un pequeño resumen de la notificación con el que se puede interactuar.
Anatomía de una notificación Android
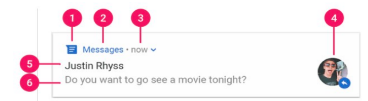
Como podemos observar, hay multitud de elementos proporcionando información en una notificación Android desplegada, vamos a pasar a enumerarlos:
- Small icon.
- App Name.
- Date (setWhen o setHowWhen).
- Large icon
- Title (setContentTitle).
- Text (setContentText).
Estos son los métodos y atributos que activan esas vistas en la clase NotificationManager. Es importante tenerlos presentes a la hora de mostrar la notificación en Android Studio. Tendremos que configurar los parámetros y, luego, avisar al sistema para que la muestre: esto es lo que yo llamo «levantar una notificación».
Mostrar notificaciones Android Studio
La forma de «levantar» notificaciones en Android Studio es utilizando la clase NotificationManager. La idea es configurar el objeto con los parámetros de la notificación que vimos anteriormente y, por último llamar a notify. Aquí tienes un ejemplo completo del código de la app AlarmNotificationSample de mis tutoriales en el que levanto una notificación cuando suena la alarma:
String NOTIFICATION_CHANNEL_ID = getApplicationContext().getString(R.string.app_name);
        Context context = this.getApplicationContext();
        notificationManager = (NotificationManager) context.getSystemService(Context.NOTIFICATION_SERVICE);
        Intent mIntent = new Intent(this, MainActivity.class);
        Resources res = this.getResources();
        Uri soundUri = RingtoneManager.getDefaultUri(RingtoneManager.TYPE_ALARM);

        String message = getString(R.string.new_notification);

        if (Build.VERSION.SDK_INT >= Build.VERSION_CODES.O) {
            final int NOTIFY_ID = 0; // ID of notification
            String id = NOTIFICATION_CHANNEL_ID; // default_channel_id
            String title = NOTIFICATION_CHANNEL_ID; // Default Channel
            PendingIntent pendingIntent;
            NotificationCompat.Builder builder;
            NotificationManager notifManager = (NotificationManager) context.getSystemService(Context.NOTIFICATION_SERVICE);
            if (notifManager == null) {
                notifManager = (NotificationManager) context.getSystemService(Context.NOTIFICATION_SERVICE);
            }
            int importance = NotificationManager.IMPORTANCE_HIGH;
            NotificationChannel mChannel = notifManager.getNotificationChannel(id);
            if (mChannel == null) {
                mChannel = new NotificationChannel(id, title, importance);
                mChannel.enableVibration(true);
                mChannel.setVibrationPattern(new long[]{100, 200, 300, 400, 500, 400, 300, 200, 400});
                notifManager.createNotificationChannel(mChannel);
            }
            builder = new NotificationCompat.Builder(context, id);
            mIntent.setFlags(Intent.FLAG_ACTIVITY_CLEAR_TOP | Intent.FLAG_ACTIVITY_SINGLE_TOP);
            pendingIntent = PendingIntent.getActivity(context, 0, mIntent, PendingIntent.FLAG_UPDATE_CURRENT);
            builder.setContentTitle(getString(R.string.app_name)).setCategory(Notification.CATEGORY_SERVICE)
                    .setSmallIcon(R.drawable.ic_notification)   // required
                    .setContentText(message)
                    .setLargeIcon(BitmapFactory.decodeResource(res, R.drawable.ic_notification))
                    .setDefaults(Notification.DEFAULT_ALL)
                    .setAutoCancel(true)
                    .setSound(soundUri)

                    .setContentIntent(pendingIntent)
                    .setVibrate(new long[]{100, 200, 300, 400, 500, 400, 300, 200, 400});
            Notification notification = builder.build();
            notifManager.notify(NOTIFY_ID, notification);

            startForeground(1, notification);

        } else {
            pendingIntent = PendingIntent.getActivity(context, 1, mIntent, PendingIntent.FLAG_UPDATE_CURRENT);
            notification = new NotificationCompat.Builder(this)
                    .setContentIntent(pendingIntent)
                    .setSmallIcon(R.drawable.ic_notification)
                    .setLargeIcon(BitmapFactory.decodeResource(res, R.drawable.ic_notification))
                    .setSound(soundUri)
                    .setAutoCancel(true)
                    .setContentTitle(getString(R.string.app_name)).setCategory(Notification.CATEGORY_SERVICE)
                    .setContentText(message).build();
            notificationManager.notify(NOTIFICATION_ID, notification);
        }
Si te fijas, verás que hay dos códigos distintos en función de la versión de Android. Como has podido imaginarte, hubo un cambio en la forma de levantarlas a partir de Android O.
Puedes ver todo el desarrollo de la app en este vídeo. Hay una segunda parte para mejorar el sistema de alarma, pero no corresponde a esta parte del curso; aún así, te recomiendo que lo veas.
Notificaciones Push Firebase
Una de las formas más comunes de forzar las notificaciones en los teléfonos es a través de las notificaciones push. Nuestra app se configura para escuchar notificaciones que vienen desde un servidor externo y, al llegar la que está esperando, levanta la notificación. Esto es una herramienta muy potente a nivel de márketing y de retención y fidelización de usuarios, ya que la tasa de apertura de la aplicación es muy alta ante una notificación push.
La manera más fácil de conseguir esto, sin complicaciones y sin tener que programar un servido ni un servicio ni nada por el estilo, es a través de firebase. En este vídeo te explico todo lo que hemos visto hasta ahora en lo que respecta a las notificaciones y añado el caso práctico de creación de notificaciones en Firebase.
¡Échale un vistazo! Por cierto, el emulador me juega una mala pasada, y, al final en los teléfonos sí que funciona ;).